

Stations
Set up a station
Choose kiosk capabilities, register the device, and verify the screen with support.
A station needs a template defining what it can do and a registration identifying the device. Arrange device setup with support, then manage its behavior through Admin → Stations.
Step 1: Create a template
Open the Templates tab and select Add Template. Enter a name, description, and station type.
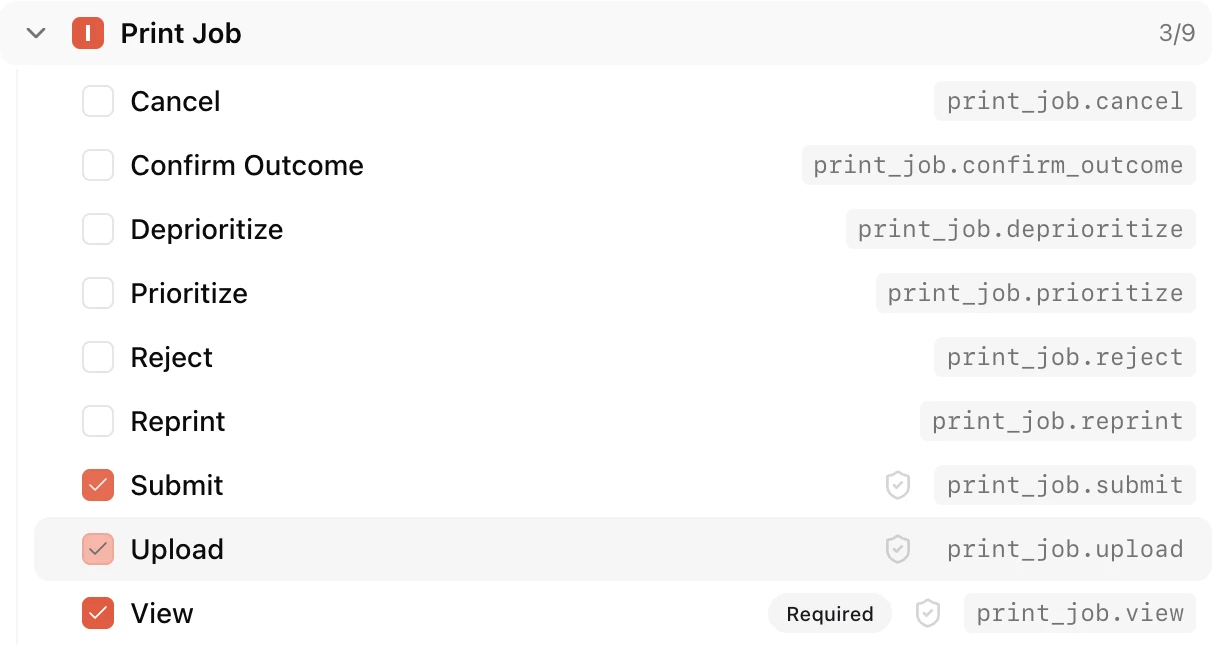
Choose only the capabilities that screen needs. Required capabilities are selected automatically; unavailable capabilities cannot be selected. Use the identification toggle beside an action to require a person to identify themselves before using it.
For example, a management kiosk can allow anyone to view printers while requiring identification to approve jobs or stop a print. Display boards only show information.
Step 2: Register the device
On the Stations tab, select Add Station and fill in:
| Field | What to choose |
|---|---|
| Name | A location staff recognize, such as Front Desk Tablet. |
| Identified by | The method agreed with support: IP address or client certificate. |
| IP Address / Client certificate | The device identity confirmed during setup. |
| Template | The template defining the screen and its actions. |
| Site | The location whose pickup bins this station serves. |
| Enabled | Keep enabled while the device should have access. |
Setting the site
For pickup, the site determines which bins and prints the station can reach. A pickup station without a site has an empty collection board and cannot start a bin check. A bin can serve several sites.
The site’s setting does not narrow the management station’s printer grid, queue, approvals, or history. Those cover the organization.
Registering a station by IP address
Use the address confirmed with support or your IT team. If it changes, the device may appear unregistered. Ask IT to keep its address stable.
Registering a station by client certificate
Support and your IT team arrange certificate setup on the device. If Client certificate is unavailable in the form, contact support to enable it. Enter the certificate or fingerprint they provide.
Coordinate certificate renewal before expiry. Replacing a certificate also requires updating the station registration.
Step 3: Open and verify the kiosk
Open your portal’s /station/ address on the registered device. An enabled, recognized device loads its assigned screen without a separate device sign-in.
Check the tabs and permitted actions, then test identification with a staff member. For pickup, confirm the expected bins appear.
If the screen says it is not registered, check that the station is enabled and that its displayed identity matches the registration. Contact support if they differ or a certificate is missing.
Card readers
If you need card identification, ask support to arrange a compatible reader and Pluraprint Desktop setup. Once configured, test a card assigned to a known user before opening the kiosk to visitors. PIN and phone identification options depend on your organization’s setup.
Tap once and wait while the screen says Looking up user…. A successful lookup closes the identification screen automatically. If the lookup takes more than 15 seconds, the station shows a timeout message; try again or choose another available method. Closing the identification screen cancels the pending lookup, so a later response cannot select a user after you leave.
Later changes
Editing a template updates every station using it. Station changes also reach open screens automatically. Tell staff before removing an action they rely on.
To retire a device, disable its station registration. To delete a template, first reassign the stations that use it.
Protecting station identification
PIN, ID number, and card identification are available only from a registered station. PINs are exactly six digits and are verified after the user selects their account. ID numbers are unique, admin-assigned numbers entered directly. A card containing six digits is still treated as a card. The server applies a shared attempt limit and increasing delays after failed identification. Wait for the indicated retry time instead of repeatedly scanning or submitting a PIN.
Enable the desired methods in deployment configuration: credentials.allowedTypes accepts pin,
idNumber, card, and qr. Administrators must configure STATION_CREDENTIAL_KEY with
32 random bytes encoded as 64 lowercase hexadecimal characters, stored separately from the
database. The user-bound PIN upgrade requires users to set a new PIN in the portal; existing cards are
unchanged by this upgrade. PINs are never displayed. Rotating or losing this secret also
requires re-enrollment. Identification remains limited to station workflows and does not sign
anyone into the operator application.
Pairing a desktop card scanner
Older Pluraprint Desktop versions continue to connect automatically, with no pairing or setup changes required. This compatibility is temporary while Desktop installations are upgraded; a later station update will require pairing for all desktop scanners. Desktop versions with Station pairing already require the steps below.
- Open a card identification dialog on the station and expand Pair this station with the desktop scanner. Copy the station origin shown there.
- On the same computer, open Pluraprint Desktop. Under Station pairing, paste that origin and select Generate pairing code. Remote station origins must use HTTPS; loopback development origins can use HTTP.
- Select Copy code, paste it into the station’s Pairing code field, and select Pair scanner within five minutes. Your browser may also ask you to allow local-network access. Allow it only for your organization’s station site.
With current Desktop, only the paired browser receives scans. The connection stays available between identification screens, but cards identify a user only while an identification screen is open. Reconnection is automatic while its refreshed credential is valid. Pair again after restarting Desktop, closing the station tab for more than five minutes, or reaching the eight-hour pairing limit.
Revoke pairing in Desktop disconnects the station. Generating a new code also revokes the previous pairing. Disconnect scanner in the station forgets that tab’s credential; use Desktop revocation if the credential may have been copied. Keep pairing codes private.